Step By Step Guide On How to Inspect Your Roof for Damage
Your roof is among the most crucial elements of your house and here we will show you how to inspect your roof for damage. It shields your home and belongings from the elements and also helps to maintain the strength of the structure of your house. However, as time passes your roof may be damaged by a variety of factors like weather conditions the aging process, and inadequate maintenance. It is essential to inspect your roof on a regular basis for signs of damage, to avoid problems and expensive repairs. In this complete guide, we’ll take you through the steps of examining your roof for damage making sure that you recognize and fix any issues promptly.
Step 1: Safety First
Before you start examining your roof, it’s important to consider safety first. The climb up a roof could be hazardous, so be sure you take the appropriate precautions. Make sure you wear appropriate footwear that has sufficient traction to ensure you don’t slip. Utilize a sturdy ladder, and a person nearby to help you in case of need. If you’re not comfortable or uncertain about climbing on your roof, it’s recommended to hire a roofing professional who is certified to inspect your roof.
Step 2: Exterior Inspection
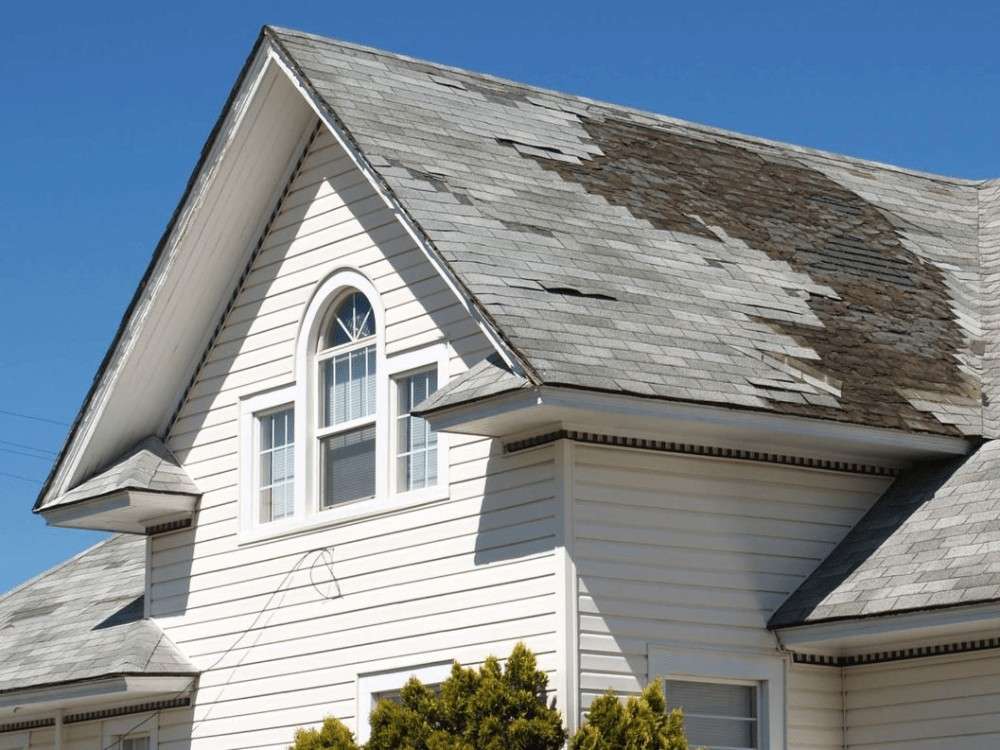
Begin by inspecting the roof’s exterior from the floor. Check for visible evidence of damage, like damaged or missing tiles, shingles that are cracked or sagging areas. Be sure to check for any accumulation of debris or vegetation that could keep moisture in and cause decay or growth of mold. Check areas of flashing that surround chimneys, vents and skylights as these are the areas most susceptible to leaks. Make use of binoculars to gain more in-depth views of the difficult-to-see areas.
Step 3: Interior Inspection
After that, enter your house and examine the walls and ceilings for indications evidence of damage from water. Examine for water stains discoloration, peeling or discoloring paint. These could be signs of a leak in the roof. Be aware of areas that are near to the vents or chimney, and also any places that the roof is in contact with the walls. If you spot any indications that water damages have occurred, it’s essential to fix them immediately to avoid further deterioration.
Step 4: Attic Inspection
Go to the attic and carefully look over the roof’s surface. Look for indications of water staining or mildew. Examine the insulation for signs of water, since excessive moisture could cause mold to grow and decrease the insulation’s effectiveness. Check for any light passing through the roof board which could signal a gap or damage to the structure of the roof. In addition, you should look for evidence of critter or pest infestations, since they could create damage on your roofing.
Step 5: Gutters and Downspouts
Examine your gutters and downspouts for obstructions or debris. A blocked gutter can cause water to overflow and soak into the roof leading to the destruction of. Check that your gutters are properly attached to the roof, and the downspouts are directed away from the house’s foundation. Make sure to clean the gutters frequently to avoid accumulation and maintain the proper drainage of water.
Step 6: Professional Inspection
While you are able to conduct an exhaustive inspection on your own but it’s recommended to hire a professional roofing contractor to examine the roof every year. They are skilled and have the expertise to spot any issues that aren’t immediately apparent to an untrained eye. A professional inspection will give you a thorough review of the condition of your roof and help you fix any issues that could arise before they become serious.
Frequently Asked Questions (FAQ): How to Inspect Your Roof for Damage
Q1 What’s the most frequent time I should examine my roof for any damage?
It is recommended to check your roof at a minimum twice each year, with the best time being the fall and spring. If you live in an area that is prone to extreme weather conditions or recently had the effects of a storm, it’s advised to examine your roof as soon as possible after the storm to determine if there is any damage that could be.
Q2: Should I fix my roof by myself?
Although minor repairs like replacing some missing shingles may be carried out by homeowners, it’s advised to employ an expert roofing contractor to complete any major repairs. They possess the required expertise as well as the tools and know-how to ensure the task is done safely and correctly.
Q3 What’s the length of time a roof last?
The life span of a roof is dependent on many factors, including the kind of roofing material and the climate of your region. In general asphalt shingle roofs last from 20 to 30 years, whereas the metal roofing can be for up fifty years and more if they are maintained properly. maintenance.
Q4: What’s indicators of damage to the roof?
The most common indicators of roof damage are damaged or missing shingles, leaks or staining on the ceiling, areas of sagging and excessive loss of granules and the growth of mold or mildew. If you observe any of these indicators you should deal with them immediately to avoid any further destruction.
Q5: How do roof inspections cost?
Cost of roof maintenance may differ based on various factors like the size of your roof, the location, and the difficulty of the inspection. A typical roof inspection will cost you anywhere between $150-$500. Some roofing companies provide free inspections as a part of their service and it’s worthwhile to inquire with local contractors for price alternatives.
Conclusion: How to Inspect Your Roof for Damage
Examining your roof regularly for signs of damage is vital to maintaining its durability and protecting your home. Following the step-by-step procedure described in this guide to identify any problems early and fix them quickly. Be sure to consider safety first when you inspect your roof. Also, think about hiring an expert roofing company to perform a thorough inspection. Implementing proactive measures to keep your roof in good condition will help you save time, money and headaches over the long term. Don’t delay until a minor issue becomes the cause of a bigger problem – get started checking your roof now!
Key Takeaways: How to Inspect Your Roof for Damage
- Examine the roof of your home at least two times each year, but more often if you live in a region with extreme weather conditions.
- It is important to ensure safety when inspecting your roof. Consider using a professional when you are unsure or uncomfortable.
- Check for obvious evidence of damage to the exterior of your home, like damaged or missing shingles, and check for flashing on chimneys or vents.
- The interior of your house for discoloration or water marks on the walls and ceilings.
- The roof’s underside in the attic to find signs of mold, water stains or insects.
- Check and clean your gutters and downspouts frequently to stop damage from water.
- You should consider hiring a roofing contractor to conduct a thorough inspection at least every year.
- If you notice any signs of damage quickly to prevent any further damage and costly repairs.
Keep in mind that well-maintained roofing is a crucial element in an ensuring and safe home. Make the effort and time to check your roof frequently and you’ll be able to be able to enjoy the peace of head which comes from knowing that your home is safe by the elements.